1: Here is a demo image in Photoshop (Click to see large image)
In this case, the rounded corners I want will be in the lowest/background layer.
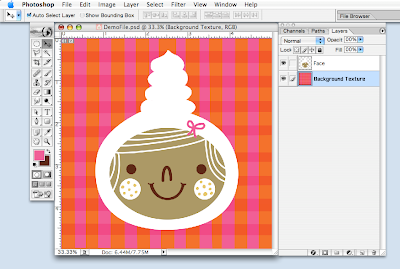
2: Go to PATH / NEW PATH, then name the path whatever you want; I name it "Rounded Corners" here.
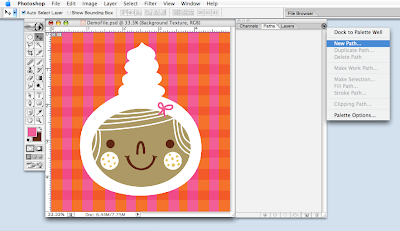
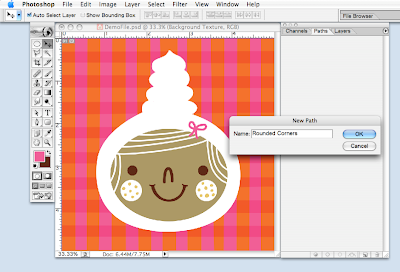
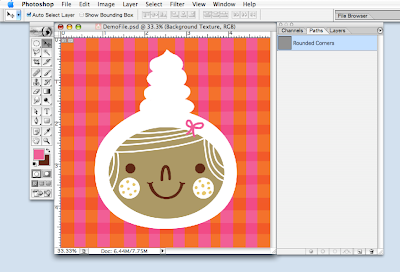
3: Go to the tool bar, select the ROUNDED RECTANGLE TOOL, drag it across the image till you get the desired size and shape. You can also play with the RADIUS on the top for different curve of the rounded corners. Mine is set up to be 0.3.
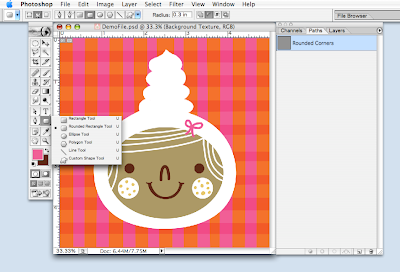 Now you can see the shape of the rounded corners.
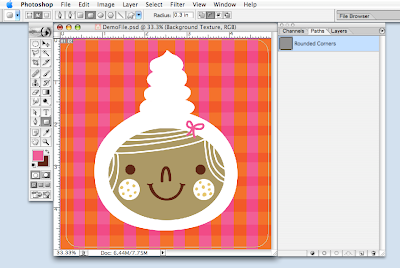
4: Hold down the COMMAND/APPLE key (I assume you use a MAC here) and go back to PATH and click that path (the blue area you see in the image above); you will see the "marching ants" here and that means you just selected the area.
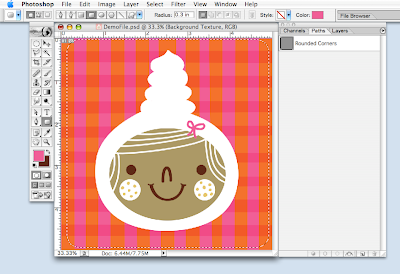
5: Now go back to the background layer.
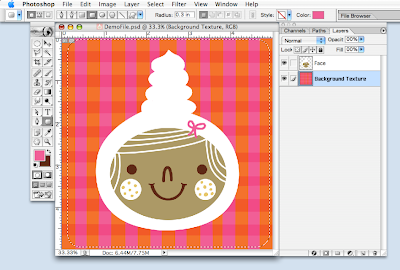
"COMMAND/APPLE key + J" will copy the selected the area from the background layer and paste it in the exact same spot in a brand new layer above it.
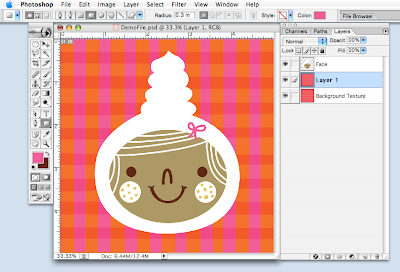 Fill the original background layer with white.
Now you can see, above the background layer, the copied-and-pasted layer with the rounded corners.
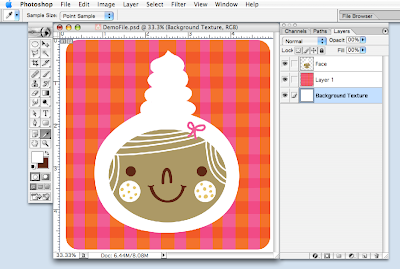
6: Now you can use the cropping tool to crop the final image. Since the background layer is white, it will look like you cropped the image that way, but in reality, the rounded corners are part of your image.
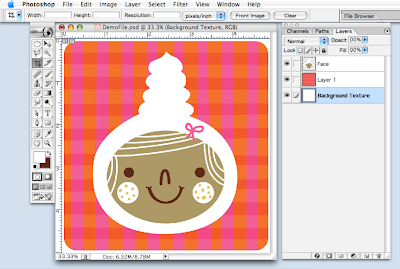
7: Here is the final result!

You can use this technique to "crop" your photo with rounded corners. (In that case, there will only be one layer: your photo.)
This is how I do it, and I do it so fast I don't even think about it anymore. If anyone has other way to do rounded corners faster, maybe you can share with us too.


9 comments:
Flora, your explanation was brilliantly perfect. Thanks so much for sharing! For taking your time to do this. Truly appreciated.
Love ♥,
Marjorie Ann
How nice!!!!!
Flora, do you make all of your images in photoshop?
Hi Joanna:
Yes. 99% of the time I do it in Photoshop,even lettering. I do a lot of my lettering in Path too cause I like the fact that I can easily adjust the shapes later.
I do use Illustrator to draw organic shapes, like imperfect circles, and then bring them into Photoshop (I don't like perfect circles unless the design calls for it),
Thanks for sharing!
I have an award for you at my blog, cheers!
I make mine the same way but in Illustrator. Just to add, I love your work, it always brings a smile to my day, you are one clever lady!
Hi Flora, thanks for sharing. I also do my round corners in illustrator but now I will try it in photoshop too. :-)
Wow, cool demo! I can't wait til I have time to work through it.
You've been awarded the Brillante Weblog Premio Award. Check it out on my blog. 8 )
Where were you three days ago? haha, I inverted a circle selection, then subtracted everything but the corner, then cut, then inverted the saved selection with transform to cut the rest, haha. Your way is much better!
I suppose you could create an action for this too...
Post a Comment