It's stormy outside tonight so I drew some little friends.
Wednesday, July 30, 2008
Wednesday, July 23, 2008
I CAN AFFORD THIS BUT DO I NEED IT?
This ice cream quest of mine is getting out of control. While I searched the internet for the cheapest giant plastic ice cream cone (BTW, I actually found a listing of the giant cone on the local Craigslist for only $5), I ran into this:

DO I NEED IT?? Not really... But man, do I WANT it! Can you blame me??? Oh come on, look at it, people, just look at it. It's PINK! And it makes ice cream just like the kind you can buy at Dairy Queen, the fluffy, soft, creamy ice cream... How can you not want it? Plus I can make my own "healthy" organic ice cream and I know exactly what goes into it... I can bring it to work and make ice cream for my co-workers' birthday parties... I can also have an ice cream party at my house. I can make ice cream for my boyfriend and enjoy his tears of appreciation... I can also make ice cream for my future kids and their classmates and I will be the most popular mom ever... I am very tempted to click the BUY IT button at the website at this moment. Very, very tempted...
What I Want And Can Afford...

...from Urban Outfitters, is this huge ice cream cone! It makes me feel so cool just by looking at it! Also, there is a flickr group called "Giant Plastic Ice Cream Cone". Check out the fun collections of giant ice cream cones all over the world!
PS: Shhhh...there are some eBay listings featuring the same giant ice cream cone and it's cheaper. But it's a bank, instead of a light.
Coveted!

This Rolleiflex Mini Digital Camera... I saw it on UrbanOutfitters.com. Isn't it gorgeous? But the price is a whopping $399... Yikes! The photo quality seems ok, but not the best. The selling point is definitely the nostalgia factor. Check out the official website to drool more.
Tuesday, July 22, 2008
Hallmark Competition

Ok... I am not allowed to enter this competition but I'd love to spread the words. For you talented creative folks, this is your chance to make a card and make a difference. Hallmark has been hosting fun contests since last year, and the latest competition, "YourHoliday', will be open for submissions from July 28 till August 18, 8 am. This time, the formats will be flat-cards, the kind that people stick on their fridges around holiday-time. Your challenge is to create a design to go on a such a card, and also to make sure your design will look good with someone else's holiday photo next to it. Come on people, this is FUN, plus if your design become one of the finalists, you will be famous, you will get paid (I assume), and the company will donate 8% of the sale to the Global Fund where all (RED) money go directly to Africa to help eliminate AIDS. It's for a good cause plus it's just simply fun to create holiday designs.
Here are some simple basics to get you started, but please go to the competition's official website for detailed information:
*Create a 5.25" x 7.25" (vertical) or 7.25" x 5.25" (horizontal) design to go on a flat photo card. (The final printed size will be 5"x7"... that little 0.25" is for the "bleed". Click here if you are still confused.)
*Design can be anything from the most simple drawing to something more fancy. You can include words in the design or not.
*Design can be anything from the most simple drawing to something more fancy. You can include words in the design or not.
*It must be about the holidays, of course.
*It has to include the color red somewhere in the design. (How much or how little is your call.)
*Write a little sentiment to go with your design. Short. Sweet. To-the-point.
So why don't you get started now?
Saturday, July 19, 2008
EZScreenPrint
I accidentally ran into these clips posted by maddstickers on YouTube and it totally grabbed my attention. I've never done screen print before but I know the traditional screen print method requires emulsions and chemicals like that, and it can make a mess. But seems like they use a new kind of screen print materials in these clips and it looks so easy, so I checked EZScreenPrint.com and sure enough, they do have these new kind of PhotoEZ screens and require no chemicals to develope. I am going to dig around a little bit more and I might get a kit to play with it. It sure looks fun.
If any of you guys have tried this before, would you let us know how you like it, please? :)
After note:
I searched more on the internet. Seems like there is another product called StencilPro which has all the same properties as PhotoEZ but is one step up. (Don't know the they from the same manufactor.) Check here to see the product line.
PhotoEZ Shirt Tutorial Part 1: Creating the Image
PhotoEZ Shirt Tutorial Part 2: Creating the Screen
PhotoEZ Shirt Tutorial Part 3: Printing with your Screen
Friday, July 18, 2008
Today's Dinner: Miso Shrimp + Beet Salad
 Ingredients:
12 medium shrimps (I save 6 for tomorrow's lunch)
Water
Japanese Miso Paste
Soy Sauce
Sesame Oil
Cooking Wine
Organic Salad Greens
Non-Salty Sunflower Seeds
Milled Flax Seeds
Fresh Beet
Roasted Sesame Seeds
To cook shrimps:
1. In a little bowl, mix about 2 table spoons of water with some miso paste (adjust to your own taste), add 1 part of soy sauce with 1 part of sesame oil into the bowl. Mix well and pour in a heated sauce pan. (If you want to end of with more sauce for later you can just double the quantity here, then you will have extra sauce for tomorrow's lunch too.)
2. Toss in the shrimps, add some cooking wine and cook until shrimps are done.
While the shrimps are cooking, prepare your salad:
1. Peel and roughly chop one fresh beet. Then use a mini food processor to further chop it into smaller pieces. You will have enough beet to last several meals.
2. In a big bowl, mix salad greens with some unsalted sunflower seeds and about 1 tablespoon of milled flax seeds. Toss and mix well.
3. Sprinkle fresh chopped beet on top.
4. Add cooked shrimps, and use the sauce the shrimps were cooked in as the salad dressing.
5. Finally, sprinkle some roasted sesame seeds on top as garnish!
Wednesday, July 16, 2008
Today's Dinner: Honey Ham Tofu Quinoa Bowl
 I only had 15 minutes to cook today and this thing took only 15 minutes to prepare... It contains two separate dishes: mushroom quinoa with seaweed + honey ham tofu. It will serve 2 people.
Ingredients:
Organic Quinoa : 1 cup
Dry Arame Seaweed (optional): about 1/2 cup
Dry Sliced Shiitake Mushrooms: about 3/4 cup
Seasalt
Hon Dashi (or other kind of soup stock powder)
A Box of Silk Tofu
Sliced Honey Hams
Soy Sauce
Sesame Oil
Balsamic Vinegar
Roasted Sesame Seeds
Prepare mushroom quinoa first:
1. First, soak 1/2 cup of dry arame seaweed in a bowl with cold water. Set it aside.
2. Bring 2.5 cups of water to boil, turn the heat down to medium.
3. Add 1 cup of organic quinoa and about 3/4 cup of dry shiitake mushrooms into the pot. (I break the mushroom into smaller pieces by hand.) Stir occasionally and let it cook for 13 minutes until all water is absorbed. Add some sea salt and dashi while cooking (you can add other kind of stock powder if you don't have dashi).
4. The arame seaweed should be soft and double in volume now. Get rid of the soaking water and add just the seaweed into the pot and mix well. Serve hot.
To prepare honey ham tofu (while the quinoa is cooking):
1. Take a box of silk tofu, plate it and slice it into smaller pieces.
2. Chop some sliced honey hams into small pieces. Sprinkle them on top of the tofu.
3. To make the sauce, mix 1 table spoon of each: soy sauce, sesame oil and balsamic vinegar. Mix well and pour it on the tofu.
4. Finally, sprinkle some roasted sesame seeds on top. That's it.
Note: You don't have to use seaweed if you are not used to the taste, or you can just use a little bit to see if you like it or not. It's so good for your health though. Arame seaweed is actually a good one to start with since it has a milder taste.
Lars and Inca
I know I've blogged about these two in my old Jellyfish blog, but I have never uploaded this photo to my Flickr page. So since I just uploaded the photo, might as well share it with you again (plus some of you guys might have not met them before). Meet Lars and Inca; they are elephants and Lars is also a luchador... :)
I made them years ago. I have to say I am really not a toy maker... I love to design them, but I hate cutting fabircs, or should I say I have no patience for the process. I guess once I get into the "zone" I would be fine, but getting into the zone takes a lot of energy. I just want to jump to the end product right away. I always envy people who really enjoy making plush toys and sewing.
Tuesday, July 15, 2008
Today's Dinner: Quinoa Tofu Salad

First, I have to confess that I have real problems following any recipes. I cook from whatever I have in my refrigerator. So my combination of stuff might looks weird, but this one is yummy and refreshing.
For this salad I used:
1 cup of organic quinoa (You can buy bulk quinoa at your local supermarket's health food area.)
organic mixed salad greens
firm tofu
raw slaw
sunflower seeds
red salsa
green salsa
sea salt
To cook quinoa:
Bring 2 cups of water to boil.
Turn the heat down to medium heat.
Add 1 cup of organic quinoa into the pot and cook about 13 minutes until all the water is absorbed. Meanwhile add some sea salt while it's cooking.
This will give you about 2 1/4 cups at the end, and I end up using only half of it for the salad (for 1 person).
1. In the salad bowl, mix the salad greens, slaw, and sunflower seeds.
2. Break firm tofu into smaller pieces and toss them in. (There is no need to cook the tofu.)
3. Add cooked quinoa into the mixture.
4. Finally, I added both red salsa + green salsa into the bowl and mix the whole thing really well.
Usually I might grill some shrimps with miso paste and add them to the salad. But I was too hungry so I skipped the shrimps for tonight...:)
Super Foods
In my previous post I mentioned that I've been trying to eat healthy starting about a month ago. I got this book by Dr. Gillian McKeith on Amazon and it is filled with great information. Too bad I don't have BBC America, otherwise I will for sure be watching her show whenever it airs. (I have to say just by simply following her advice on how to eat and what to eat, I've lost about 6 or 7 pounds already and I am never hungry.)
The other day, I was watching the morning show while the hosts and their guest nutritionists started to talk about the 10 super foods that will "save your life", I had to get a pen and papers to take down some notes. According to the show, here are the 10 super foods that we should be eating as part of our regular diet (not in particular order):
 And here are the notes that I've taken down:
1. Swiss Chard:
Very important for retinal health; if you are a smoker or are around second hand smoke a lot, you need to eat this veggie.
2. Flax Seed:
Fights depression and rich in omega 3 fatty acid. You have to grind flax seed before you eat it (use a coffee grinder).
3. Cinnamon:
You can take the pill form, or just grind the cinnamon and sprinkle it into your coffee or oatmeal... doesn't have to be fancy either; regular cooking cinnamon will do.
4. Quinoa:
Rich in protein, fiber, also a very good source of magnesium and vitamin B2. Add it to your diet if you suffer from migraine headaches.
5. Ginger:
Eat a piece of candied ginger after meal to help digestion, or drink some ginger tea.
6. Guava:
Rich in vitamin C, potassium and fiber. Eat the whole thing with skin.
7. Pistachio:
Full of fiber and antioxidants, also gives you more bang per calories than other nuts. It's a heart-healthy snack.
8. Parsley:
Rich in vitamin K, preventing blood clog. In the show they said Frank Sinatra used to have a big bowl of raw parsley every day; he would sprinkle salt and pepper on his parsley and just ate it like that.
9. Beet:
Fights cancer and decreases inflammation. Eat it raw; don't cook it: You can grate it and use it in your salad.
10. Açaí Berry (pronounced "ah-sai"):
This is the number one, mother of all super foods according to the show.
It has 10 times more antioxidants than red grapes and 10-30 times the anthocyanins (antioxidant flavonoids that protect many body systems) of red wine. It can come in the form of paste, or juice/smoothie. I buy the juice from Costco; it's cheaper.
Remember there are a lot more super foods that are not on this list. It's important to eat a diet with variety of natural foods. : )
The other day, I was watching the morning show while the hosts and their guest nutritionists started to talk about the 10 super foods that will "save your life", I had to get a pen and papers to take down some notes. According to the show, here are the 10 super foods that we should be eating as part of our regular diet (not in particular order):
 And here are the notes that I've taken down:
1. Swiss Chard:
Very important for retinal health; if you are a smoker or are around second hand smoke a lot, you need to eat this veggie.
2. Flax Seed:
Fights depression and rich in omega 3 fatty acid. You have to grind flax seed before you eat it (use a coffee grinder).
3. Cinnamon:
You can take the pill form, or just grind the cinnamon and sprinkle it into your coffee or oatmeal... doesn't have to be fancy either; regular cooking cinnamon will do.
4. Quinoa:
Rich in protein, fiber, also a very good source of magnesium and vitamin B2. Add it to your diet if you suffer from migraine headaches.
5. Ginger:
Eat a piece of candied ginger after meal to help digestion, or drink some ginger tea.
6. Guava:
Rich in vitamin C, potassium and fiber. Eat the whole thing with skin.
7. Pistachio:
Full of fiber and antioxidants, also gives you more bang per calories than other nuts. It's a heart-healthy snack.
8. Parsley:
Rich in vitamin K, preventing blood clog. In the show they said Frank Sinatra used to have a big bowl of raw parsley every day; he would sprinkle salt and pepper on his parsley and just ate it like that.
9. Beet:
Fights cancer and decreases inflammation. Eat it raw; don't cook it: You can grate it and use it in your salad.
10. Açaí Berry (pronounced "ah-sai"):
This is the number one, mother of all super foods according to the show.
It has 10 times more antioxidants than red grapes and 10-30 times the anthocyanins (antioxidant flavonoids that protect many body systems) of red wine. It can come in the form of paste, or juice/smoothie. I buy the juice from Costco; it's cheaper.
Remember there are a lot more super foods that are not on this list. It's important to eat a diet with variety of natural foods. : )
Thursday, July 10, 2008
DEMO: Rounded Corners II
This is a continuation of my last post. OK... There is a faster way to give rounded corners to a simple photo (even though after you get familiar with both ways you may think they take about the same amount of time to do), but I wanted you to try the PATH way... It's good to get familiar with PATH. : )

5: Duplicated the photo by going to the photo layer, then COMMAND+J (The magic short cut that copies and pastes your image to the exact same spot into a new layer above).
I am going to use my mom's photo for this demo.
1: Open the photo in Photoshop. (I use Photoshop CS3)

2: Go to yoUr old friend "ROUNDED RECTANGLE TOOL".
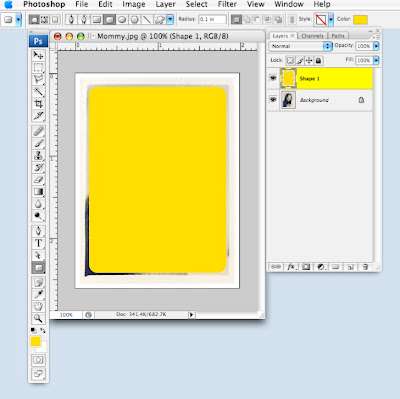
3: Draw a rounded rectangle across the photo to your desired size. (Note: I have changed the radius on top to just 0.1 in for this demo, cause the photo is quite small.) This is what you'll see:
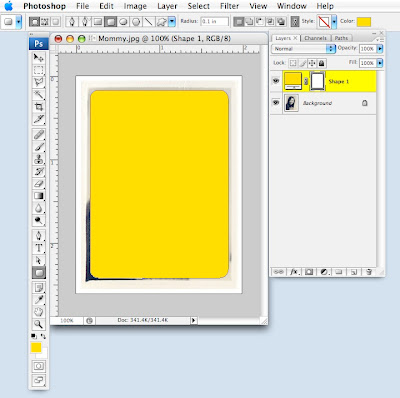

4: Whilte you stay on that layer, go to LAYER / RASTERIZE / SHAPE. Now your rectangle becomes a non-edible solid shape.

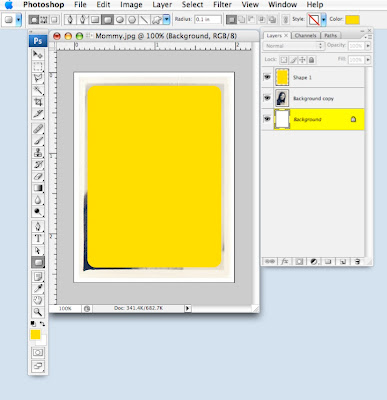
5: Duplicated the photo by going to the photo layer, then COMMAND+J (The magic short cut that copies and pastes your image to the exact same spot into a new layer above).
Fill your old photo layer with white.

Move your new photo layer above the rectangle layer.
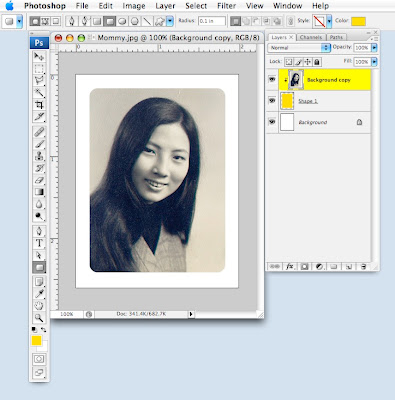
6: Hold down COMMAND+OPTION+G. This will put the photo inside the rounded rectangular shape (or whatever shape you draw beneath the photo layer), like this:

Then just crop the image closer for less white space, or you can just leave it like this.
And here is the finished photo!
Wednesday, July 9, 2008
DEMO: How to do rounded corners
I've been asked how I cropped my image so it has rounded corners. It's so easy in Photoshop but it's hard to explain it without images, so I decide to do an easy step-by- step demo here. Actually, the way I do it, the image is not cropped with rounded corners, but rather the rounded corners are part of the image, and then the image gets cropped the normal way.
1: Here is a demo image in Photoshop (Click to see large image)
In this case, the rounded corners I want will be in the lowest/background layer.
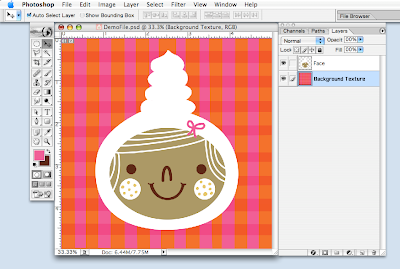
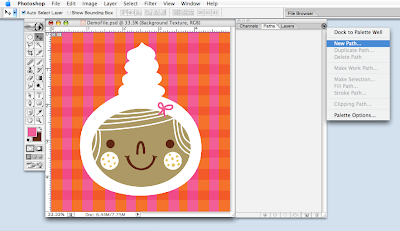
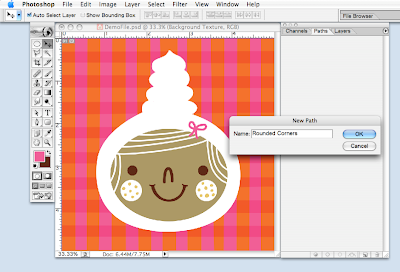
2: Go to PATH / NEW PATH, then name the path whatever you want; I name it "Rounded Corners" here.
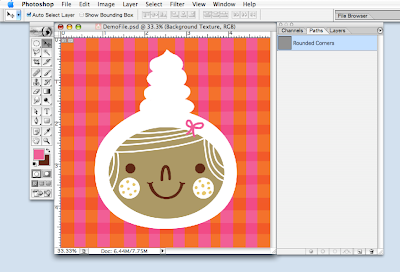
3: Go to the tool bar, select the ROUNDED RECTANGLE TOOL, drag it across the image till you get the desired size and shape. You can also play with the RADIUS on the top for different curve of the rounded corners. Mine is set up to be 0.3.
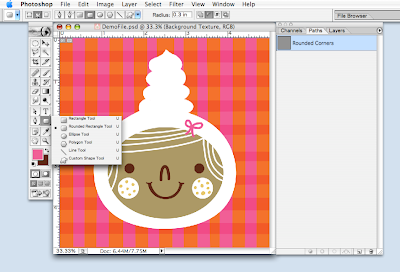 Now you can see the shape of the rounded corners.
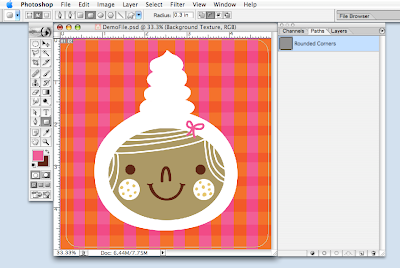
4: Hold down the COMMAND/APPLE key (I assume you use a MAC here) and go back to PATH and click that path (the blue area you see in the image above); you will see the "marching ants" here and that means you just selected the area.
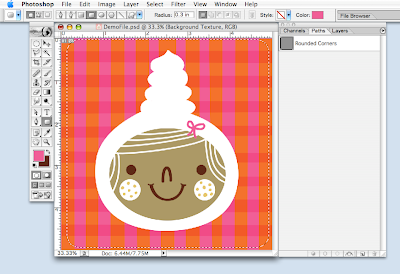
5: Now go back to the background layer.
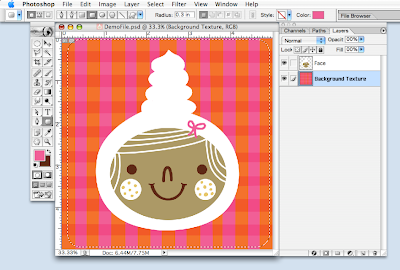
"COMMAND/APPLE key + J" will copy the selected the area from the background layer and paste it in the exact same spot in a brand new layer above it.
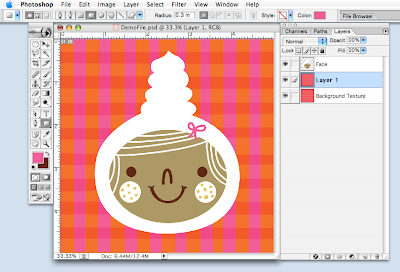 Fill the original background layer with white.
Now you can see, above the background layer, the copied-and-pasted layer with the rounded corners.
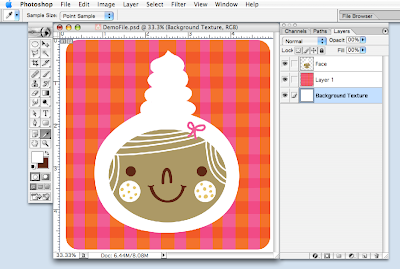
6: Now you can use the cropping tool to crop the final image. Since the background layer is white, it will look like you cropped the image that way, but in reality, the rounded corners are part of your image.
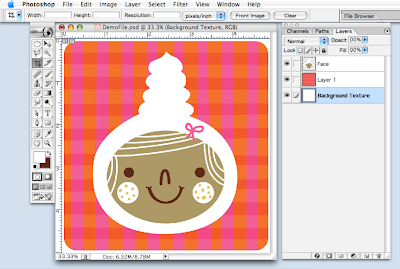
7: Here is the final result!

You can use this technique to "crop" your photo with rounded corners. (In that case, there will only be one layer: your photo.)
This is how I do it, and I do it so fast I don't even think about it anymore. If anyone has other way to do rounded corners faster, maybe you can share with us too.
1: Here is a demo image in Photoshop (Click to see large image)
In this case, the rounded corners I want will be in the lowest/background layer.

2: Go to PATH / NEW PATH, then name the path whatever you want; I name it "Rounded Corners" here.


3: Go to the tool bar, select the ROUNDED RECTANGLE TOOL, drag it across the image till you get the desired size and shape. You can also play with the RADIUS on the top for different curve of the rounded corners. Mine is set up to be 0.3.
 Now you can see the shape of the rounded corners.
4: Hold down the COMMAND/APPLE key (I assume you use a MAC here) and go back to PATH and click that path (the blue area you see in the image above); you will see the "marching ants" here and that means you just selected the area.

5: Now go back to the background layer.

"COMMAND/APPLE key + J" will copy the selected the area from the background layer and paste it in the exact same spot in a brand new layer above it.
 Fill the original background layer with white.
Now you can see, above the background layer, the copied-and-pasted layer with the rounded corners.

6: Now you can use the cropping tool to crop the final image. Since the background layer is white, it will look like you cropped the image that way, but in reality, the rounded corners are part of your image.

7: Here is the final result!

You can use this technique to "crop" your photo with rounded corners. (In that case, there will only be one layer: your photo.)
This is how I do it, and I do it so fast I don't even think about it anymore. If anyone has other way to do rounded corners faster, maybe you can share with us too.
Saturday, July 5, 2008
IF: Soar (Sour, actually...)
Thursday, July 3, 2008
Subscribe to:
Posts (Atom)


