Showing posts with label Demo. Show all posts

Thursday, July 10, 2008

DEMO: Rounded Corners II

This is a continuation of my last post. OK... There is a faster way to give rounded corners to a simple photo (even though after you get familiar with both ways you may think they take about the same amount of time to do), but I wanted you to try the PATH way... It's good to get familiar with PATH. : )

I am going to use my mom's photo for this demo. 

1: Open the photo in Photoshop. (I use Photoshop CS3)
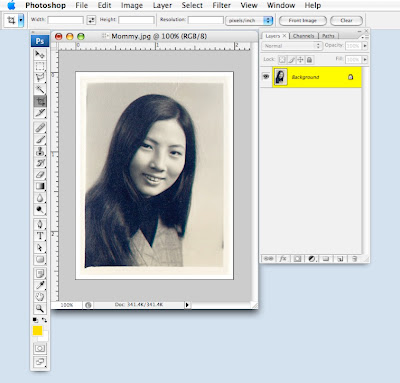

2: Go to yoUr old friend "ROUNDED RECTANGLE TOOL".


3: Draw a rounded rectangle across the photo to your desired size. (Note: I have changed the radius on top to just 0.1 in for this demo, cause the photo is quite small.) This is what you'll see:
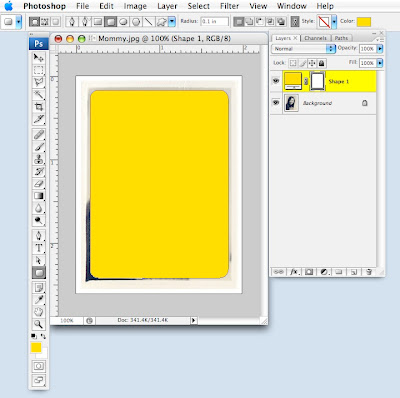

4: Whilte you stay on that layer, go to LAYER / RASTERIZE / SHAPE. Now your rectangle becomes a non-edible solid shape.


5: Duplicated the photo by going to the photo layer, then COMMAND+J (The magic short cut that copies and pastes your image to the exact same spot into a new layer above).


Fill your old photo layer with white.


Move your new photo layer above the rectangle layer.


6: Hold down COMMAND+OPTION+G. This will put the photo inside the rounded rectangular shape (or whatever shape you draw beneath the photo layer), like this:


Then just crop the image closer for less white space, or you can just leave it like this.


And here is the finished photo!


Wednesday, July 9, 2008

DEMO: How to do rounded corners

I've been asked how I cropped my image so it has rounded corners. It's so easy in Photoshop but it's hard to explain it without images, so I decide to do an easy step-by- step demo here. Actually, the way I do it, the image is not cropped with rounded corners, but rather the rounded corners are part of the image, and then the image gets cropped the normal way.

1: Here is a demo image in Photoshop (Click to see large image)
In this case, the rounded corners I want will be in the lowest/background layer.


2: Go to PATH / NEW PATH, then name the path whatever you want; I name it "Rounded Corners" here.


3: Go to the tool bar, select the ROUNDED RECTANGLE TOOL, drag it across the image till you get the desired size and shape. You can also play with the RADIUS on the top for different curve of the rounded corners. Mine is set up to be 0.3.

Now you can see the shape of the rounded corners.


4: Hold down the COMMAND/APPLE key (I assume you use a MAC here) and go back to PATH and click that path (the blue area you see in the image above); you will see the "marching ants" here and that means you just selected the area.


5: Now go back to the background layer.


"COMMAND/APPLE key + J" will copy the selected the area from the background layer and paste it in the exact same spot in a brand new layer above it.

Fill the original background layer with white.
Now you can see, above the background layer, the copied-and-pasted layer with the rounded corners.


6: Now you can use the cropping tool to crop the final image. Since the background layer is white, it will look like you cropped the image that way, but in reality, the rounded corners are part of your image.


7: Here is the final result!


You can use this technique to "crop" your photo with rounded corners. (In that case, there will only be one layer: your photo.)

This is how I do it, and I do it so fast I don't even think about it anymore. If anyone has other way to do rounded corners faster, maybe you can share with us too.